|
• • • • Part 1. Best software on how to crop a video for Windows and Mac Tipard is the best Video Cropper software for Windows users. Cropping video is one of the editing function and simple to use. You can also enjoy other fantastic editing features like trim, merge, split, rotate, enhance video quality, adjust video effect, add watermark and optimize brightness and contrast, etc. After cropping, you can convert cropping video to 4K/1080p HD video with higher video quality and then save to the computer for later use. If you are a Mac user, you can learn more about software. Step 3 Crop video on editing interface Click Video Enhance button in the main interface to open the editing interface. QUICKTIME PLAYER (MAC OS 10.12). Open your.avi or.mov in QuickTime Player. To crop, in the top menu go to Edit > Trim. A yellow frame will appear in the. Enter video editing panel: After loading source media files to Leawo’s Mac converter, right click the source media file and select “Media Edit” option. Crop video size under “Crop” tab: In “Crop” tab, select a style in Zoom (Letter Box, Fullscreen, Pan&Scan), then set the values of Left and Top. Select a video and click Crop column and enter Crop window. Here you can crop area size including Original, Crop area, 16:9 and 4:3, adjust the position of crop area, and choose zoom mode like Letterbox, Medium, Pan & Scan, and Full. After cropping, you can click Apply button to save all your operation, and then close the editing interface. Tips: In the editing interface, you can not only crop you video, but also rotate video, adjust video effect, enable 3D settings, enhance video quality, and add watermark to the video. Multiple video editing features provided for you to customize the video to be perfect. Top 3 Online Video Croppers to crop video online 1. Video Cutter This is easy to use and intuitive Video Copper for Free, which allows you to frame the video to the desired area or change frame proportions. You can also cut video files right in your browser window and rotate video 90, 180 or 270 degrees. It supports up to 500 Mb file and outputs your selected video quality and format. Video Toolbox is totally Free Online Video Cropper, which enables to process video files up to 600 MB. It allows you to easily crop, trim and cut your video, as well as add effects and adjust the audio, or even replace the audio track entirely. The software works very simply but offers good output and an easy workflow. Filelab Video Editor is also a Free Online Video Crop Tool. It provides a very user-friendly editor and quite simple to add some clips, crop videos, add text over the top and create a transition. To use the site you do need to install a plugin – so you might need to speak to your ict technician to get it installed on your school computers. The same plugin is used for both the audio and the video editor. Video crop on Windows Movie Maker, Premiere, and iMovie 1. Crop video in Windows Movie Maker is used for Windows users to edit videos for free. It can crop video with a bit difficult steps if you have never used this software. Add video file you want to crop by use click Import button.  
From the filters window and click Copping button to open cropping window and you will use along both X and Y axes to cut the video frame. Piriform ccleaner for mac. After cropping, you can press ok button and then export the cropped video file to local disc. How to crop a video in Adobe Premiere is professional Video Editing Tool, without making any attempt, you will be assuming that its difficult cropping video in this program but it's not advisable to do that. Make the initial attempt to crop video and reap maximum benefits. You can import your video files to the 'media bin' and this is possible by simultaneously clicking on 'I' and 'Ctrl' keys on the keyboard. How to create a bootable external hard disk. And then click effects control tab to drag video to the timeline.
0 Comments
[ U PDATE (Nov. 2017) – These still work to download the original CC 2015 installers. Midi to mp3 converter for mac. If you’re looking for direct links to the newest CC 2018 versions, then.] The new Adobe earlier today, including 15 upgraded desktop applications with across the board plus some big performance boosts And there’s no wait: the CC 2015 software is available immediately for worldwide download via the This means everyone gets either a free upgrade or a free trial – but some folks want or need to access the new tools directly without using Adobe’s download/app manager. So below we’ve curated a complete set of Adobe CC 2015 direct download links for on Windows and Mac OS, for instant access (plus the ability to use your own download manager) if you have any difficulty with what Adobe normally employs and want to get the tools or trials without it These can also come in handy if you want offline standalone CC 2015 installers to use, store, or back up with (i.e., copy to USB flash/thumb drive, burn to, etc). Most people download the trials by signing up for the and using the to select and download any or all of these products, although here on this page no membership is required to access the free trials. In other words, with these direct links you can try out any of the just-launched CC 2015 apps without the Creative Cloud. Special: Legally download dozens of for a limited time! Whether you’re considering just a like or getting the, you can always use these free trials to install, run, and activate the new software on your system, without needing to reinstall. All of the CC 2015 tools will install and run together on the same computer(s) alongside any older Adobe versions such as CC 2014, CS6, CS5, CS4, and CS3. These CC trials are fully functional for 30 (or ). One big improvement with CC is Adobe no longer splits out files into different language sets – all languages are now included in a single multilingual download, including English, Western European (French, German, Dutch, Italian, Spanish, Portuguese, ), Eastern European (Russian, Polish, Hungarian, Czech, ), Middle Eastern (Hebrew, Arabic), and Asian (Japanese, Korean, Chinese). 
Adobe Systems: Adobe Premiere Pro CS6 for Mac Adobe Premiere Pro CS6 is a kind of video editing software which can work natively and directly with the latest mobile. It's also equipped with a customizable as well as highly intuitive interface. Its workflow is smoother and higher efficient than ever. So if you need to install additional languages, just run the same installer again and choose another language. Below is a table with direct links for all of the CC 2015 applications. These links go to the authentic and original files residing on Adobe’s servers, are guaranteed genuine, safe, legal, and will not change. To shorten download times, Adobe no longer packages both the 64-bit and 32-bit Windows versions in the same installer – so choose the one that’s right for your machine. If you’re unsure, then for how to determine which type of system you have. **** On Mac OS v. 
10.12 “Sierra” (only), you need to to install. Note: Very Important Instructions More Direct Download Links In order to enable the direct links below, Adobe’s servers must first set a special permissions cookie on your browser. If not, then you will receive an “access denied” message instead, and the connection will fail. So please follow these instructions carefully or the links will not work! • Adobe temporarily turning off any surfing restrictions you might have running, like site or cookie blocking, filtering, firewalls or antivirus software. •, before clicking any of the links in the table below – this is critical! Differences between office for mac and windows. • If asked, sign in with your Adobe ID or take a minute to create one for yourself (). Now you’re logged in at Adobe with the browser cookie set, so you can instantly download any of the software below. Just make sure you have enough disk space. • Download the files either by clicking directly on the DDL links, or by right-clicking and choosing “ Save Link As” on the popup menu. • For Windows, the download is either an.exe file or a zip file (with a.7z or.zip extension). If not an.exe, then you can use a free utility like to extract the installer from the.7z or.zip file. For the Mac, it’s always just a single, straightforward.dmg file for each program. [Update: For Dreamweaver and Fuse only, please.] Related: Do you believe any of these? Here’s when to use these instructions: • You have a license to install Windows 10 and are upgrading this PC from Windows 7 or Windows 8.1. • You need to reinstall Windows 10 on a PC you’ve already successfully activated Windows 10. If you are installing Windows 10 on a PC running Windows XP or Windows Vista, or if you need to create installation media to install Windows 10 on a different PC, see section below. Note: Before you install Windows 10, check to make sure your PC meets the for Windows 10. We also recommend going to the PC manufacturer's website for any additional info about updated drivers and hardware compatibility. • Select Download tool, and select Run. You need to be an administrator to run this tool. • On the License terms page, if you accept the license terms, select Accept. • On the What do you want to do? Page, select Upgrade this PC now, and then select Next. • After downloading and installing, the tool will walk you through how to set up Windows 10 on your PC. All Windows 10 editions are available when you select Windows 10, except for Enterprise edition. For more information on Enterprise edition, go to the. • If you don't have a license to install Windows 10 and have not yet previously upgraded to it, you can purchase a copy here: • If you previously upgraded to Windows 10 on this PC and you’re reinstalling it, you don’t need to enter a product key. To install Windows 10 Creators Update using the Media Creation Tool, follow these steps: Go to Windows 10 Creators Update download page ( link ) Click on the Download tool now. Your copy of Windows 10 will automatically activate later using your digital license. • When Windows 10 is ready to install, you’ll see a recap of what you’ve chosen, and what will be kept through the upgrade. Select Change what to keep to set whether you would like to Keep personal files and apps, or Keep personal files only, or choose to keep Nothing during the upgrade. • Save and close any open apps and files you may be running, and when you’re ready, select Install. • It might take some time to install Windows 10, and your PC will restart a few times. Make sure you don’t turn off your PC. 
Follow these steps to create installation media (USB flash drive or DVD) you can use to install a new copy of Windows 10, perform a clean installation, or reinstall Windows 10. Before you download the tool make sure you have: • An internet connection (internet service provider fees may apply). • Sufficient data storage available on a computer, USB or external drive for the download. • A blank USB flash drive with at least 8GB of space or blank DVD (and DVD burner) if you want to create media. We recommend using a blank USB or blank DVD, because any content on it will be deleted. Utorrent. • When burning a DVD from an ISO file, if you are told the disc image file is too large you will need to use Dual Layer (DL) DVD Media. Check a few things on the PC where you want to install Windows 10: • 64-bit or 32-bit processor (CPU). You’ll create either a 64-bit or 32-bit version of Windows 10. To check this on your PC, go to PC info in PC settings or System in Control Panel, and look for System type. • System requirements. The Best 5 Free Mac Photo Editors for Photo Editing in Mac You may want to create and but don't want to pay for any money. Actually, there are many free Mac photo editors provided but find some really good ones can be hard. Here we list the top 5 free for Mac for your reference and hope you can enjoy Mac photo editing with them. 
Make a comparison and choose the one you like according to your photo editing needs. Free photo editing software for Mac 1: The GIMP for Mac OS X GIMP is a popular open-source image editor for Mac OS X and is often considered as the 'free Photoshop' because of its similar interface and features with Photoshop. It is a beta software developed by volunteers, so software updates and stability may be a problem. But many users reflect that the software comes with no big problems and they enjoy using it. Please note that GIMP is compatible with Mac OS X or later. Free photo editing software for Mac 2: Seashore Seashore is an open source photo editor for Cocoa and is based around GIMP's technology. It uses the same file format as GIMP, but was developed as a Mac OS X application. The developer said it features gradients, textures and anti-aliase text and brush strokes. Free crack for adobe cc 2018. Besides, it supports multiple layers and alpha channel editing. Free photo editing software for Mac 3: Chocoflop Chocoflop is another great free photo editor for Mac. It is free but is still under development. The great features of this free Mac photo editor is that it can non-destructive, rich text, core image filters, raw support, etc. While edit photos. Download Fotor Photo Editor for macOS 10.9 or later and enjoy it on your Mac. In the top 5 free apps overall in more than 50 countries ***. The problems just take going online and asking; answers are available and solutions easy with. 
And it's a pity that it now doesn't support Snow Leopard. Free photo editing software for Mac 4: Pixen Pixen is a free graphics editor for Mac OS X and is very good for animation and pixel based editing. Its features include layers capability, title view, animation features, etc. Free photo editing software for Mac 5: Picasa Picasa serves as the perfect photo editor, photo viewer, photo manager and photo sharing tool. It enables you to eliminate scratches & blemishes, fix red-eye, crop and more, turn photos into movies, collages, slideshows and more. After that, you can upload your retouched photos to Picasa Web Albums to share them with family and friends. By the way, if you have so many photos, you can make photo slideshow with the and burn the slideshow to DVD for long-term preservation. Use the movie styles to turn your photos to Hollywood like movies instantly! Or you can make a digital scrapbook with the to make a memory book. When we talk about photo editing, Adobe Photoshop always comes to mind. After all, it’s the best photo editing tool in the world, being used by professional photographers, businesses and even for personal use. It will let you edit any photo in ways you can’t even imagine. However, it is still not the go to tool for most users due to many reasons. First of all, its is very complex to use, making it hard for an average user to take advantage of it, also, most don’t need such robust editing features in their daily editing. Last but not least, it is hella expensive and most people can’t even afford it. Fortunately, we don’t have to depend on Photoshop for our photo editing needs as there are tons of free and paid photo editing tools available. Of course, they are not as good as Photoshop, but they offer quite robust editing tools and some can be even compared to as best Photoshop alternatives. Contents • • • • • • • • • • • • • • • • 10 Best Free Photo Editing Software to Edit Photos Like a Pro To help you edit your photos on your favorite operating system, we have created a list of free best photo editing software containing editing software for Windows, Mac and Linux. All you need to do is choosing the best photo editing software for your needs and start editing! Best Photo Editing Software for Windows Let’s check out the best photo editing software available for the most used desktop OS, Windows. GIMP (GNU Image Manipulation Program) actually works on all three operating systems, Windows, Mac OS X and Linux, so we will start with it. GIMP is a free, open-source photo editor and sometimes called a free alternative to Photoshop. It’s editing capabilities are almost close to Photoshop and will let you do all types of basic and complex editing like, effects, crop, sharp, lasso, paint and brush tools and tons of other features to make your pictures look out of this world. However, it is also a bit complicated to understand, so you better have some editing knowledge or a handy opened up. It does define what a specific tool does just by hovering your mouse cursor over it, so a little time spent with it can help you start editing like a pro. PhotoScape is another feature rich freeware tool available for Windows and Linux that is perfect for an average user. It will let you do all types of edits like, resize, adjust colors, add effects, backlight correction, add frames, remove red eye, stamp, draw and add text to a picture. Right now I pay for the Photoshop / Lightroom photography plan. I had both desktop apps on my MBP and I have all of the mobile apps not just those two but also kinds of mobile apps from adobe Photoshop Mix, Photoshop Fix, PS Express, Sketch, Illustrator Draw etc. I have recently gone to 100% iPad Pro as I didn’t use my MBP at all anymore. I also have affinity Photo. 
Question is, can I cancel my photography plan subscription and still use the adobe mobile apps as if nothing happened? Meaning is the plan only for the desktop apps and more CC storage?? I don’t really use the CC storage anyway and 2 GB is more than enough as I usually delete my working files once done a project anyway. I think only the basic Lightroom Mobile is free. According to the FAQ, you will miss the ability to edit raw files and access to the Local Adjustment tool in Lightroom for mobile, as well as integration with some of the other Adobe mobile apps. I can't tell whether you can still use those apps or not, because the wording is a bit strange to me: • The ability to access the photos you have in Lightroom in other Adobe mobile apps including Photoshop Mix, Photoshop Fix, Adobe Spark Page, Adobe Spark Video, and more. Adobe is easily the biggest name in digital creativity. While it’s best known for its flagship products such as Photoshop, InDesign, and Premier, Adobe has a whole fleet of software for creative professionals and hobbyists in the areas of photography, video and film editing, web development, animation, sound engineering and more. Adobe Photoshop CC 2018 is THE ONLY full version of Photoshop now available. Adobe Lightroom CC CLASSIC 2018 is THE ONLY currently supported (full) version of Lightroom Classic (formerly Lr 6 AND Lr CC) now available. Adobe Lightroom CC 2018 is a totally different program. It is an update of the old Lightroom Mobile. All of it can be accessed through Adobe’s online portal known as the, via a yearly subscription payable either monthly or in one lump sum. Mentioned in this article. Subscribing to the Creative Cloud’s entire collection of apps gives you plenty of tools to fuel your creative drive, and offers the best price-per-program value. But this could be overkill if you’re only looking to use one particular app, or your interest is in a single subject—say, photography. Luckily, Adobe offers free trials of all its programs, as well as different subscription options, so you can find the programs and plan to best suit your needs. Adobe Creative Cloud free trials The best way to know whether a program is worth committing to is to try it out yourself, hands on. Adobe gives you seven days to test any of its Creative Cloud apps, starting on the day of download. In addition to your chosen program/s, Adobe lets you download the Creative Cloud desktop app itself to trial. The Creative Cloud program acts as a hub for all the individual Adobe programs you try or subscribe to; as well as a hub for fonts, stock art, and other assets (a selection of which comes free with your trial), to use among various Adobe programs; it also adds a Creative Cloud folder to your system for syncing work among different devices. While you need to create an account to trial any apps, you do not need to provide any payment information. Once the seven-day trial period ends, your download expires. You won’t lose any of the work you created or saved to your device, but the work won’t be editable without access to that Adobe program. Adobe Creative Cloud In the Creative Cloud app you can see all the options available for trial and select which ones you want to download. Creative Cloud All Apps Adobe’s All Apps plan is the closest thing to Adobe’s Creative Suite of yore. It offers all 22 of Adobe’s creative software offerings. How do you flip computer screen horizontally for teleprompter mac. If you need a wide variety of creative tools at your disposal, investing the allows you to download and use whichever desktop and mobile apps you need. 
The All Apps subscription comes with benefits such as 100GB cloud storage, which goes hand in hand with an included portfolio website for showing off your work. Adobe also gives you an extensive selection of fonts and various tools for social media. One such example is the premium version of Adobe Spark, which helps users create engaging content for all sorts of social and online platforms. Adobe offers a free version of Spark (and many of its other peripheral desktop/mobile apps), but the premium features available with the paid plan add a more professional finish to branded content, making it a useful business tool. All Apps with Adobe Stock Depending on how you plan to use Adobe’s full complement of creative tools, you may want to spring for the All Apps with Adobe Stock option at. That extra $30 grants you access to Adobe’s library of 90 million different royalty-free photographs, vector images, illustration, videos, templates, and 3D art to use within your projects, as well as 10 standard assets per month. Movavi Photo Editor 4 for Mac review. Adobe Lightroom, along with the now-deceased Aperture app, showed that there's space in the pro-grade image-editing marketplace for apps that offer quick fix. Jul 09, 2018 Movavi Photo Editor 4 for Mac review. Adobe Lightroom, along with the now-deceased Aperture app, showed that there's space in the pro-grade image-editing marketplace for. Free text editor for code mac. Movavi Slideshow Maker for Mac is an affordable slideshow maker software suitable to be used by all types of small businesses to create a slideshow presentation. You only pay a flat price and can use it to create as many slideshows as you want for your small business. Movavi Slideshow Maker for Mac features a user friendly interface and beginners with no experience can instantly use it without having to refer to any tutorial. The following are 9 steps on how to to create a stunning photo slideshow for a business presentation. Download Movavi Slideshow Maker for Mac You can download Movavi Slideshow Maker for Mac by going to the Movavi official site. From the top navigation menu, you are to choose Slideshow Maker under the Photo heading. Maybe in most people eyes, Windows products couldn't rival with Mac software at least in Mac systems, but today is the time to change your thoughts – this Windows media player for Mac (El Capitan/Yosemite/Mavericks) can both work perfectly on Windows 10/8/7 and Mac OS X (OS X 10.11.4 and before). Download quicktime player for mac. And this magic key is.
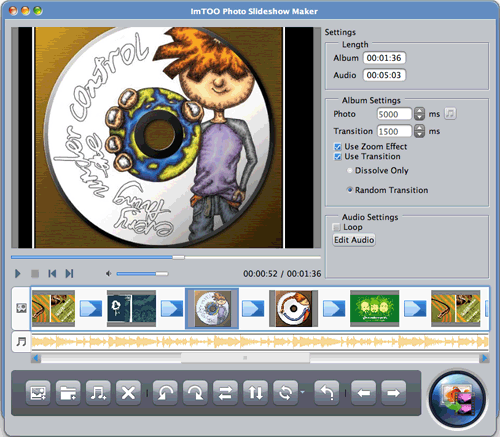
Another way to change the image duration is to drag the photo slide clip to expand/reduce its length. Dragging the clip to the right will expand its width and increase the image duration. On the other hand, dragging the clip to the left will reduce its width and shorten the image duration 4. Separate Rows in Timeline If you take a close look at the timeline, you will notice that there are three distinct rows. The row where all your photos will be load is the middle row. The row above the photo row is for adding video and the row below the photo row is for adding audio files. 
Just like photo files, videos and audio files can be added by clicking on the Add Media Files button. Entering Some Text on the Photo It is all right to add photo that you haven’t yet add the text because there is a feature that allows you to add animated text in Movavi Slideshow Maker for Mac. Animated text is a moving text that allows you to convey a few line of your message to the audience during the presentation. Adding Animated Title to Your Slide There are many styles to be found in the Titles tab. You can take your time to browse the selection of animated text until you find one that is suitable for your slideshow. It is possible to preview the animated text styles before adding it to your slide. If you like to include an animated text onto your slide, you must drag it onto the slide and double click the text box in the timeline to enable inputting of text. Avoid Repetition: Customize Toolbars and Keyboard Shortcuts contributed by If you find yourself constantly repeating the same menu actions, chances are there is a command you can move to on a menu or toolbar, or assign a keyboard shortcut, for easy access. Word nearly always offers multiple ways to do what you want, and there are far more predefined commands than just the ones on obvious menus or toolbars, including specific fonts, AutoText, and styles (and macros in versions before Word 2008, although Word 2008 does not let you control AppleScripts through the Customize dialogs). In addition, if you don't like the Word 2008 toolbar setup, using custom toolbars can let you work around some inconveniences, such as that the Reviewing toolbar will only appear if Word thinks you need it for that document, and that the Standard toolbar cannot be undocked. But you can't turn off the Document Elements bar in Print Layout view, sorry. FIND/CHANGE (a selected word within a file or a file). INSERT PAGE BREAK. MAKE AN ALIAS. NEW (create new document, folder, page). Word 2008: to customize toolbars, use View>Customize Toolbars and Menus, or right-click the document toolbar. (If you have a one-button mouse, hold down control while clicking to right-click). To customize the keyboard, look under Tools>Customize Keyboard. Word 2004 and earlier: both the keyboard and menu are available through Tools>Customize. Protect Your Customizations! By default, any changes to toolbars, menus, or keyboard shortcuts will be saved in the Normal template. Be sure to back up your Normal Template regularly if you are customizing these things. In Word 2004 and earlier, you are advised to create a new custom toolbar rather than changing the existing ones, because new custom toolbars can be recovered from a corrupt Normal temple, but default toolbars that you changed cannot be recovered. In Word 2008, this is still a good idea—but then you have to give up the ability to dock the toolbar in the document window. If you want to change a toolbar that can be docked, then be extra careful to back up the Normal template regularly. Customizing a Toolbar Simply drag any command from the Customize dialogs onto a toolbar. Acrobat reader for mac free. A fake main menu bar (File, Edit, View, etc) will appear when you are in the Customize Toolbars dialog. You drag the commands onto this fake main menu bar, and the changes will show up in the real one when you close Customize Toolbars. You can move commands from toolbar to toolbar—for instance, if you want to add the Reviewing features to another toolbar, hold down Option while dragging the command. This will create a copy on your new toolbar. To change the appearance of a command on the toolbar, right-click the command and select Properties. The Customize Toolbars dialog must be open in order to select Properties. :max_bytes(150000):strip_icc()/dictationcommand-582b38e05f9b58d5b11d4f00.jpg "Shortcut for word search on a page")
If using Word 2008, you will need to undock a built-in toolbar in order to access Properties. The change will persist when you re-dock the toolbar. Finding the Right Command In the Customize dialogs, the left column lists various categories, and the right column changes to show the commands under that category. Oddly, the All Commands category sometimes has commands that are not listed in any of the File, View, etc categories. It can be quite difficult to figure out exactly what Word calls the thing you want to do, so the Customize dialogs requires some exploration and can be very frustrating. It’s often rewarding, however, and more you use it, the better you will be at guessing correctly, and the quicker it will become. Some versions have a space to show a description of the selected command, which is extremely helpful. • You can get a complete list of commands by name by selecting Tools>Macro>Macros, where it says “Macros in”, select “Word Commands”, select the command called “ListCommands” and press “Run”. • If you know the name of the command you are looking for, the alphabetical All Commands list is the best way to find it. You can navigate the long list by typing letters. • If you are able to do what you want, but want to change the way you access it, the dropdown menu on the Undo toolbar icon will list Word’s name for a function, letting you find it in All Commands. 
Sometimes you may need to prefix that name with the appropriate category name (Insert, File, etc). • If you know the keyboard shortcut but want to know the command name, pretend you are assigning any other function to that shortcut in Tools>Customize. Word will warn you that the shortcut is already assigned to “CommandNameYouWantedToKnow.” • Use Help>Send Feedback in Word to request that MS add a search box to the Customize dialogs, in future versions. More Information: Basics Advanced Mac users:, from and Special Cases. How to Make a Percentage Graph in Excel. What’s the Difference Between a Bar Chart and Other In this section, we’ll provide steps and images to create a bar chart in Excel 2011 for Mac. How to Make a Percentage Graph in Excel. A percentage graph is another name for a pie chart. Making a Pie Chart in Excel is even easier. The pie charts are characterized because the entire circular shape represents 100% of the data to be included and it will be divided into different portions, usually of different colors, in which each one will represent a different part depending on the value of. Comprehensive Excel pie chart tutorial explains how to create a pie chart in Excel, add or remove the legend and data labels, show percentages A pie chart can be difficult to draw by hand, with tricky percentages presenting an extra challenge. However, in Microsoft Excel you can make a pie chart in. This wikiHow teaches you how to create a visual representation of your data in Microsoft Excel using a pie chart. WikiHow's Content Management Team closely monitors the work from our editorial staff to ensure it meets our high standards. How to Make a Pie Chart in Excel. I'd like to make a chart (preferably on its own sheet) that is a combination of a regular pie and a doughnut. The regular pie sits in the middle and the doughnut surrounds it. How to make a pie chart in excel 2011 for mac. Use iTunes to Update. To do this you need to have a computer, Mac or Windows. Make sure that you have the latest version of iTunes installed on your computer. If not, update iTunes (iTunes > Help > Check for Updates). Here is how you can update your device’s software: Plug your device to your computer using its USB cable. If you do have recent backups and have been updating your apps in the last week, you should plan for 30 minutes to apply this upgrade since it runs a conversion step when the device restarts. For many people, it might be best to schedule the update for the evening when the device is plugged in to power and connected to WiFi. Hey buddy, i has the same issue like you. I installing an office 2013 thru purchased on US website and it hang on the part that take age to install. So i try many way until i found a quick solution which are: Repair an Office application TIP If you’re having trouble installing Office, see. If an Office application isn’t working properly, sometimes restarting it will fix the problem. If that doesn’t work, you can try repairing it. When you’re done, you might need to restart your computer. • Go to Control Panel. • In Windows 8, on the Start screen, type Control Panel, and select Control Panel in the search results. • In Windows 7 or Vista, click Start > Control Panel. • Click Programs > Programs and Features. • Click the Office application you want to repair, and then click Change. • In Office 2013, click either Quick Repair or Online Repair. In Office 2010, click Repair > Continue Just use online repair instead of quick repair. It will take about 15min for streaming and background installation. After finished, just type your product key. That all, it done and you can start use it and activated too. (Make sure you use medium fast speed internet) Good Luck Ken, Malaysia. 
Is a post by from. The is big, but the longest part of the upgrade is the installation for most users. If you’re, the new upgrade shouldn’t take too long to install on your MacBook, MacBook Air, iMac, MacBook Pro or other Mac. Apple’s High Sierra update first arrived in late 2017 with plenty of. 
The new macOS 10.13.5 update is smaller and more focused, but it still takes a while to install. The macOS High Sierra update is large, and you may see an even larger update size if you are not coming from macOS Sierra. One of the most common questions is, “how long does the macOS High Sierra update take to finish?” It will take longer to upgrade from macOS Sierra to macOS High Sierra. If you are already on macOS High Sierra and just need to install the latest release like macOS 10.13.5, it will take at least 20 minutes to install. Plan to set aside a little bit of time for this update, during which you cannot use your computer. Task Time Backup to Time Machine (Optional) 5 minutes to a day macOS High Sierra Download 20 minutes to an 1 hour macOS High Sierra Installation Time 20 to 50 minutes Total macOS High Sierra Update Time 45 minutes to an hour and 50 minutes We don’t know exactly how long your macOS High Sierra update will take since download times will vary based on your Internet connection and based on your device. File: simcity 2000_amiga_mac.7z. Click the button below to generate the download link. How to install and play the game. Files for Mac can be run immediately on all versions of OS X (Lion, Maverick etc). You just need to uncompress the ZIP archive and move the '.app' file into your Applications folder. Sim city 2000 for mac os 9. Download SimCity 2000 for Mac. SimCity 2000 allows the user to build and manage a metropolis. SimCity 2000 is an city building, economic simulator. This classic game is sure to keep you occupied for hours and hours. You can play SimCity 2000 on newer Intel-based Macs using the DOS version. Nov 13, 2018 - Bluestacks in an Android emulator for your Mac or PC and offers a scaled back version of the Instagram android app, all you need is a Google. Similarly, PC users can download the official Instagram app for free from the Windows Store, but posting and editing photos is only available for tablets and PCs with touchscreens and backward. :max_bytes(150000):strip_icc()/instagram-1519537_960_720-5ada1f9d0e23d900368d9be6.jpg "Instagram App For Mac Laptop") 
Instagram is the most famous and very useful photo sharing application for smartphone users and gaining more popularity all over the globe. People are showing very interest to Download Instagram for PC. This app has more than 300 Million active users.This app is initially released in October 2010 and developed by 2 friends Kevin Systrom and Mike Krieger.In April 2012 this service was bought by Facebook Inc.Using this amazing app you can share the photos and videos instantly to popular social networking sites like Twitter, Facebook, Tumblr, Flickr etc. Instagram PC app allows you to upload unlimited photos,you can Share photos to Instagram directly and also you can able to edit the photos with amazing effects. You can also able to download the Instagram photos to computer directly.In this app you can share the videos with Maximum 15 Seconds duration.Whenever you open this app you will see the latest photos and videos.Now I am going to share the complete tutorial in step by step process to Download Instagram for PC free. Using this guide you can easily install Instagram on computer, after installation you can able to Share photos to Instagram and also you can able to download Instagram photos to computer. Officially the Instagram PC version in not released so you need to use the bluestacks app player to use Instagram on PC. Sometimes, this is done too easily and you will need to delete the custom Stationery --- fortunately, this is also easily done. Apple's Mail client for Mac OS 10.5, also known as Leopard, includes a feature called Stationery, which allows you to add HTML-designed backgrounds or themes to your emails. Mail provides a variety of standard Stationery templates or you can easily create your own Stationery from the File menu. How to make stationary for mac mail with designer pro. Vectr is completely free, cross-platform and easy to use vector graphics software of the new generation. We are officially launching our app on Mac App Store today, and your support is super important for us. In this media kit you will find all the information about Vectr, our recent Mac App. Creating vector-based graphics on the Mac isn't just Adobe Illustrator's purview. We rounded up a few great alternatives that let you make your own vector art Inkscape is a surprisingly full-features vector graphic editor app, and it’s free. The app was conceived as an open source alternative to Illustrator. Vector Graphics Editing Software for Personal Computers. PROS: VectorDraw has built-in support for third-party printing software., A clean layout is suited for those who have never used such a program before. Vector graphic software for mac. Vector graphics differ from raster images in one key area: they use mathematical expressions to draw the lines, shapes and colours you Using the open source development model The Best Mac-Only Open Source Software The Best Mac-Only Open Source Software When most. Bluestacks is the free android emulator which helps you to play mobile apps on PC in android environment. How to Download and install Instagram on PC and laptops using bluestacks. To create your own bootable USB device using your own flash drive (note that the device must be at least 4GB or larger), follow the instructions below. 1) on any Lion compatible Mac running Snow Leopard. Office for mac free torrent. Adobe reader for a mac. Preview is the default application on Mac OS X to open PDF files. Ease deployment - Manage Reader deployment using a wide range of IT resources, including the Adobe Customization Wizard, Microsoft System Center Configuration Manager (SCCM), Microsoft System Center Updates. Top 12 Best PDF Reader for Mac (macOS 10.14 Mojave Included). Part 2: Troubleshooting on Working with PDF in Mac OS X. Part 3: Choose the Right Mac PDF Reader That Is Best for You. You can free download Adobe Reader for Mac and set it as your default PDF reader on Mac. Adobe Acrobat Reader DC 2019.008.20071. Requirements: Mac OS X (Intel). User Rating More powerful than other PDF software, Adobe Acrobat Reader DC for Mac (formerly Adobe Reader for Mac) is the free, trusted standard for viewing, printing, and annotating PDFs. Home > Office and Editing > Adobe Reader for Mac. Mac OS X 10.0 Cheetah. Adobe Reader for Mac Screenshots. Screenshots are not available for this software. Free Adobe Systems Mac OS X 10.10/10.6/10.7/10.8/10.9 Version 2018.011.20063 Full Specs. Editors' Rating Adobe Reader proves to be the most functional, free PDF reader and editor available. Admittedly, Preview for Mac does share some of the features available on Adobe Reader. 
2) Right click on “Mac OS X Lion” installer and choose the option to “Show Package Contents” 3) Inside the Contents folder, you will find a SharedSupport folder and inside the SharedSupport folder you will find the InstallESD.dmg. This is the 10.7 Lion boot disc image. 4) Copy InstallESD.dmg to another folder like the Desktop. To do so, simply click and drag the file to the desired location while holding down the Option key. You'll be on the Templates for Excel page. As you work on the calendar, you'll probably want to it. 2019 calendar for mac pages. In the list of categories, click Calendars. 5) Plug in the flash drive and launch Disk Utility (/Applications/Utilities). 6) Make sure the flash drive is properly formatted highlighting the flash drive at the left (make sure to select the device and not the volume shown under it) and clicking the Erase tab across the top right. Then ensure that the Format drop-down menu is set to Mac OS Extended (Journaled) and click the Erase button. Confirm the dialog ensuring that you want to erase the device and all information on it (make sure you backup any existing information on the flash drive before this point). 7) Select the Partition tab on the top right. Using the drop-down menu for Volume Scheme, choose 1 Partition as the partition scheme. Create disk image from flash drive. Browse other questions tagged mac disk-utility or ask your own question. 6 years, 3 months ago. 12,019 times. Backup and restore windows partition on macbook. Macbook SSD Volume Erase Failed (trying to restore MAC OSX) 0. Highlight the partition by clicking on it in the space it is shown below the Volume Scheme drop-down and then click on Options underneath it. Select GUID Partition Table and click OK. This will allow the Mac boot from the drive. You may now name the device in the Name textbox. Insure that Format is set to Mac OS X Extended (Journaled). When you have finished, click the Apply button to format the USB device. A warning will pop-up asking if you are sure you want to partition the media. Click the Partition button to continue. 9) Click on the newly created volume listed under the USB device on the left. This volume will have the name of the device you set in the previous step. Click the Restore tab at the top right. In the Source area click the Image button. Select the disk image InstallESD.dmg and click open (you may also drag-and-drop the disk image into the Source area). In the Destination area, make sure that the USB device’s name is showing. If it isn’t, simply click and drag the volume from the list at the left into the destination area. Click Restore and confirm the dialog informing you the volume will be erased. 
You will be prompted to enter the admin password for your Mac and the process will begin. The bootable USB device will be created and a progress bar will show the current status of the operation at the bottom of the screen. 10 ) When the operation is complete, you can verify that the flash drive is now bootable by selecting it and clicking the Info button in the upper left corner of the Disk Utility window. Bootable status will show as Yes. To boot from the USB device, simply hold down the Option key while your Mac is booting up. A screen will appear asking you which volume you would like to boot the system from. Click on the OS X installer USB drive and the system will boot using the USB stick. You will see faster boot speeds using the USB installer compared to a DVD installer disc. |
AuthorWrite something about yourself. No need to be fancy, just an overview. ArchivesCategories |

 RSS Feed
